Thursday, February 5, 2009

Because I love my skin


See how much I love my skin? Hahaha. The picture above is made to be perfect (yalar, photoshop-ed!) but in fact, my skin doesnt look like what you guys think it would be. They may look nice in pictures because we have photoshop and make up but if you do not have both of these, sigh. I'm afraid my readers get nightmares.

Major problems about my skin are like; sensitive to most of the facial products (My skin usually itches and go swollen. I cannot go for facial one! Damn sad), too dry and big pores cum damn lots of blackheads. And these gigantic pores and blackheads are not only on my nose but also on my cheek; the partial near to the nose. Maybe its caused by the blackhead peeling-off mask that I do regularly.

So what about people who doesnt own or know how to use Adobe Photoshop? No worries. I have got something to recommend you girls and guys :)

First of all,
The Garnier Pure Self Heating Sauna Mask.


So what does it supposed to do?
Well, this product works to remove impurities and excess sebum that can block your pores. Like said, it is able to keep your pores clean for seven days and therefore you'll only need to use this once a week. It's self-heating formula helps opens up the pores on your skin so that it can be deeply purified.


What does it contains?
The product contains natural ingredients of clays which are able absorb excess oils and zinc. They are known to regulate the skin. It also contains cucumber extract.


How do you use it?
Its as simple as ABC! Even easier than to cook the instant mee. Hahaha it actually rhymed ;p So anyway, similarly to cooking a packet of instant mee, this self-treatment takes you only 3 minutes, 3 minit, 3
fen zhong! All you need to do is apply the product on your face, particularly on the T-zone areas. The T-zone areas are the forehead, nose and chin. Leave it for 3 minutes (You can sit on the toilet bowl while reading magazine, please dont walk around your house because you might scare the others. Its blue weh) then rinse it. That's it!

So did it work on me?
After the treatment, my skin felt really fresh and tingly. Wee! And remember me saying that I have sensitive skin? I did not react to the mask at all! :D


Another product would be the
Garnier Pure A Anti Imperfection Scrub Wash.


So what does this supposed to do?
This scrub wash is developed to help fighting against the stubborn imperfection. It has the formula to tighten pores, regulate sebum, removing blackheads, and impurities. It also delays skin regreasing and helps to clear imperfection cum stopping them from popping up again! So say bye bye to black heads and greasy skin!


What is it made of?
It is made of Zinc and Salicylic acid for the anti bacterial side. It smells good :)


How do you use it?
Squeeze the liquid out from the tube and apply it on your face. But before that, make sure your face is cleansed. Then, gently massage the scrub mask. Remember to concentrate on your T-zone because that area seems to be the most stubborn area of our face's skin. Rub for about 2-3 minutes then rinse it thoroughly. That's it. If your skin is dry, I do advice that you apply some moisturizer on your skin :)

So did it work on me?
I'm happy to say YES! Once again, I'm really happy that my sensitive skin did not react to it. After 3 days of using it, the gigantic pores on my T-zone are now much smaller too although they are not entirely small yet. Soon I guess! Keke. And also, my skin is now less greasy. Damn happy okie.


Hehehehehehe. So what are you waiting for? Go get it now!! I cant wait to see my skin getting better and better. Muahahaha *evil*

Labels: ,


Tuesday, January 20, 2009

How I fix my eyes everyday...

I've posted something similar before, but I just want to blog about it again. Hahaha.


This is how my eyes look every morning, naked! Emo. I used to have single eyelids for both eyes when I was younger but as I grew up, the double eye lid appeared on my right eye ONLY. Its like a joke to me man. I have to one small one big eye more than a decade already. And I still look like that. Sad :(


This is my erm, magic sticker that can make me look normal. Haha. It cost me only RM7.90 and I've been using this roll since last February, recommended by Lie Peh. She taught me to stick on my eye lid every night before I sleep. Like how you stick a paper on the wall; I am supposed to stick my upper eye lid to my skin! I tried doing it for 2 days and it sucked and sucked badly. Sigh.


So I changed the way to help my eye. I cut the sticker into thinner ones as shown. Hahaha. That explained why I could
tahan using one roll of sticker for a year.


I stick it on my skin also, but only on my skin. A place that can create a double eyelid for me.


And there, this is the spot! Once I open my eye, I'll see double eyelid! :)


There you see! I'm not lying. Hahaha. My eye looks much bigger too. Well at least they are more balanced. Hehe. Yay! I have friends that did the same thing and they need not do it anymore. Double eyelids became permanent! I'm waiting for that day!


Hahahaha. Eyebrows added :)


And I like drawing only one eye because I look really funny. It shows how different am I with and without my thick eyeliner. Why am I always with this thick eye liner drawing? Because I need to cover my sticker. If I dont draw eye, you will see light reflection on my eye lid one. Hahaha. Sounds dumb right?


But besides eye liner, I dont know how to draw anything else. I dont know how to put eye shadow *_* I also dont know how to put fake eyelashes :( Fail to the max. I can only apply thick mascara. Haha. But not too bad right?

And this is how I fix my eye everyday! Fast and easy :D

Labels:


Sunday, November 9, 2008

Making Onigiri, the Cute Way

Japanese food is my all time favorite and its also one of my favorite past time to make sushi and onigiri; or also known as rice balls. Hehe. It has been ages since I last made them and usually I do not cook alone. This time, I cooked it all by myself. Hahahaha and it was during my actual birthday when I did this. I feel... accomplished, nice... but a little weird. Haha.

Here are some easy steps to make
onigiris :) But before that, make sure you have the japanese-style rice, japanese vinegar, water, food fillings and seaweed (optional) and most importantly, a pot or a rice cooker. Haha.

#01 Rinse the rice
Must rinse okie! At least once or twice or not you will see insects floating around in the water later. You would not want to eat it. Haha. Tips! Do not throw the water away, use it to water your plants. You can also use it for facial mask if you want.

#02 Cook the rice
Please make sure that you put the correct amount of water. If you put too much, the rice will turn out watery and over moisture. If there is not enough water, the rice will turn into rocks. How to make sure its the right amount of water to put in? As for me, I'll follow my mood. Haha. I'll usually make sure that the water level is double of the rice's level. Do some simple math. If the rice is 200ml, then put in 400ml of water. That is how I cook lar, which is always correct. If you ask me what do I cook best, I would say rice. Seriously ;p If you prefer stickier rice, add more water la.


#03 Preparing food fillings
While cooking the rice, you may want to prepare your food fillings. This is what I used (picture above) for my
onigiris. I'm not sure what is that called but you can buy that in 100 yen shops or Isetan supermarkets (prices vary a lot though!). Other food fillings are like ebiko, egg, cucumber, crab stick and bla bla bla. Depending on your own preferences.


#04 Cool rice yo :)
After you prepared the fillings, I guess its about time when the rice are done. Lift the pot with gloves, please dont miss this out, or not you will burn your fingers. Then, pour in vinegar. Do not put in too much, maybe two spoons of it. Then, Stir it well. Hahahahaha and I do cheat a bit in this step, I usually test the taste of the rice if its okay. If its not, I'll add more vinegar until I'm happy with the taste ;p The more you add, the sweeter your rice will be. You must add the vinegar when the rice is still HOT. Its easier for you to stir well them anyway. Do that until you are satisfied with the taste then leave it to cool down. I do not encourage you to cool it down in the fridge cause it will dried up the rice lar.

#05 Moulding it!
Once the rice is cooled down. It is ready to be molded :) Please wash your hands again. If you want to make traditional onigiri without moulds, these are what you need to do. Make sure you wet your hands a little, place a scoop of rice on your hand (with or without gloves). Then, use two hands to play with the rice. Hahaha not a very nice term though. Mould it until it looks like a fat and thick rounded edged triangle rice ball. Hehe.

If you have moulds, wow! The process of making these onigiris will be so much faster and easier. Just stuff the rice into the moulds only ;p See pictures below.


Taadah! And there you go. Cute and plain
onigiris :)


#06 Adding flavors
Remember the food fillings? If you want to add flavors to your
onigiri, this is what you should do. Pour the flavoring into another bowl of rice and mix them well. I do this later because I want to have more flavors :) If you want to have only one flavor and lesser steps, do this before you mold the rice.

And actually, that's about it! Very easy right? But to make the
onigiris cuter, follow this extra step.

#07 Why you so cute one?
Get a sauce pen, or triangle plastic bags specially made for icing drawing. Fill in with sauces like mayonnaise (I dont like!) or
wasabi! :) Next... You start doodling the your rice balls!


Cute or not!!! Hahaha. If you have nothing better to do, or have more time and effort to make them even cuter, you can cut seaweeds or other food to decorate your
onigiris weh. Hahaha. I dint have much time the other day and therefore I did only very simple ones. I will take some time to buy more food fillings to make my onigiris even cuter and tastier :)

See!


Masterpiece on the last Sunday. Will make more soon once I have the time! Very yummy okay, not just cute. Now, tell me your special or creative guides and ideas on making onigiri! :D

Labels: ,


Friday, April 25, 2008

Girls, makeups & camwhoring

I have been reading blogs, girls' blogs that have posts ranting about the make ups they do and the procedures. I also want to post something like that! Hahahahaha.

And normally the we will start by posting our picture before makeups! Beware!!!!


#01 This is me without anything on my face. Naked face. Oh ew. Look at my eyes :( I think I need a cosmetic surgery, getting my eye lids done. So ugly that I cant even smile infront of the camera. Haha.


#02 I'm just too tired to put on eye lid stickers everyday. It actually hurts each and everytime i stick and peel them off ::( But I haveno other choices now.


#03 Once I'm done with sticking on the sticker, I continue by drawing my brows. A little bit at the front and at the end. Then after that, I'll draw on my eyeliners. I cannot not draw it. I'm so dependent on my eyeliner because it can helps me to hide the sticker, sometimes. Hehehe.


#04 Why my eye so scary one?!!?


#05 Then depending on my mood, if I'm happy and not in a hurry, I'll put on mascara :)I like to make my lashes dark and long. But one thing, I do not like to curl them.

Oh well, that's about it actually! Hahaha I do not put on concealer beacuse when I do, they will be quite obvious in pictures that are taken with flashes. I do not put on foundation. I do not put on blusher, unless I look very pale and that I'm going for some formal events. I do not put on lip gloss or lip balm because I will end up eating them. Hhahahahaha. I put a lot of attention to my eyes. I think they are the most important features to be drawn nicely. Hehe. But I also dont put on eye shadow because I dont have any ;p


#06 Although the differences are not a lot and obvious, but at least I felt more confident and comfortable. Can smile already.


#07 My make up drawer :)


#08 And these are the most important ones plus the eye lid sticker. Hehe. Did you know, I really feel much better after make ups. Shit. I am now so dependent on the make ups already. I dont think I can go out without them. Of course not to the extent that places I go like the market, or anywhere else that is not appropriate for make up lar.

See lar, after make up can camwhore already!!!


#09 Playing with the fan beside me. Oh well, my smile a bit awkward here. Hahaha.


#10 I was also trying to camwhore with my guitar, Monkey but I failed. Its very hard for me to camwhore in the same small frame with the big Monkey. Sigh.


#11 Unless I cut away myself like this. And why is my leg so black in colour ah!?


#12 Oh yeah, count how many strings does Monkey has. Only 5!! How to play?! That is why I am playing with Carmen's for the whole week. And I named it King Kong. Hahahahaha.


#13 And lastly, my favourite picture because I looked very emo. Hahahaa.


And no matter how good I look in these pictures (I dint photoshop my face, just the colours), remember how I look before this! ;p


MUAHAHAHHAHA.

Labels:


Saturday, January 26, 2008

It's OK to be Ugly!

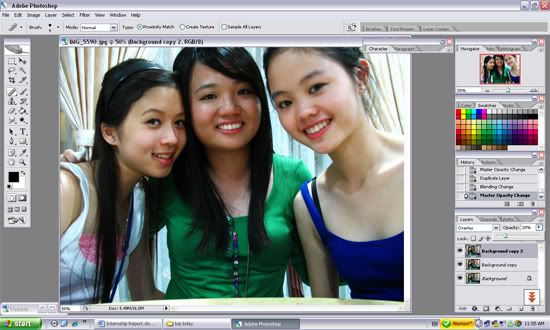
Yes, seriously. I actually havent been using my concealer sinces ages because I've got photoshop! Hahaha. And when concealer plus flash, the picture you take will suck. Okay, that's not the point but this post is actually a post to teach you how to fix your pictures in Adobe Photoshop, in basic steps. And this is also usually how I fix my pictures before posting :)

Of course, firstly you have to launh your programme. Then, open the picture or pictures that you want to fix. One rule that I always insist in photoshop is DUPLICATE your picture before you edit it.

Things will go wrong okay. Nobody is perfect and bumi mana yang tidak ditimpa hujan. Haha. You can always undo your wrongs but there is only limited times you can undo it. And therefore by duplicating the layers before editing them actually helps you when you cant undo your wrongs anymore. You can actually erase the partial of the duplicated layer later.


How to duplicate layers in Adobe Photoshop?

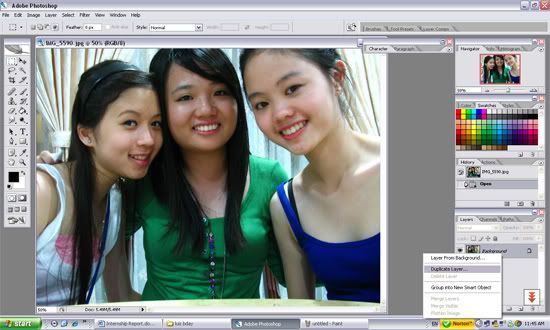
Easy! Like shown in the image above, right click on the bar at the bottom right of your screen that says, "Background" then click on "Duplicate Layer". Click on "OK" layer. Then, you'll see another layer pop up above the "Background" layer.

What's next? The next step is changing the levels in photoshop automatically. Why? It actually helps you to re-adjust the levels, or to say, the colour of your picture. Like, if there's a blue tinted layer on your picture because you took the picture in early morning, "Auto Levels" will help you re-adjust it to the original colour it supposed to be. There is another function, "Levels" but its very mafan because you cannot adjust it automatically.


How to make auto levels?

Well, go to "Image" at the bar on top, "Adjustment" then, hit on the "Auto Level" button. That's even easier right? Hehe. After Auto-ing your levels, you'll see the difference of your original picture's colour and also after that. You can see the difference easily by clicking on the "Visible/Invisible" icon which looks like an eye.

Okay okay, after that, one of the most important step; removing pimples!! Pimples are sick and I have plenty of them that lasted from internship. Besides pimples, what also can remove. Wrinkles lar, mole lar, scar lar, anything lar.


How to remove my pimples?

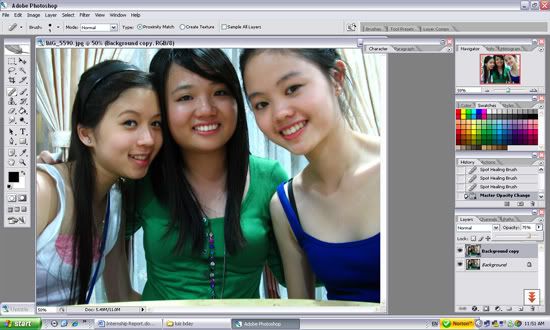
Just by a few clicks away! Click on the icon that has a plaster on it. It is the "Spot Healing Brush" that will help you making yourself pretty :) In my advice, you should enlarge your picture so that you can erase them cleanly and precisely. Make sure your brush size is same as your pimple or not you might ruin your skin.


Like me, I also remove my neck's wrinkles or whaever you call it. But if you remove it completely, it might look very fake, and this is what you can do. Adjust he opacity level!

How ah? How to adjust the opacity level ah?

Okay, move to the box which I cant remember the name, on the bottom righ tof the screen again like shown in above, just kindly adjust the percentage of it. It works like adjusting the transparency of the layer. You can adjust it to any percentage suiting to yourselves.

And that is all. This is what i usually do to my pictures. Secret revealed! And now, I am solving a question people usually ask me. Why are your pictures so sharp? Whay are the colours so nice? Well, actually ah, its because of the camera. Canon can produce very sharp coloured pictures one lor, especially under the sunlight. I dont need to photoshop it one. But if you want to know how I'll show you how :)


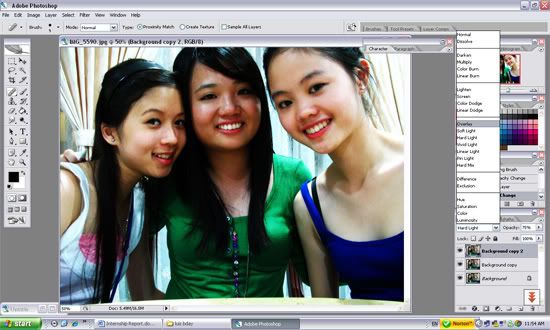
Go back to the righ bottom box where you see "Normal" with an arrow beside. Change it to "Overlay". And you'll see the difference. Haha. You can actually play with the options and you'll get different fun effects. As you can see after choosing the "Overlay" option, the colour turns very very fake. So as usual, adjust the opacity until it suits you :) And that's all!


Ooh! And did you forget to duplicate that layer before adjusting the colour? ;p


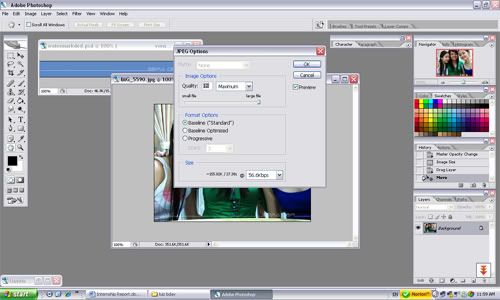
And finally, you can save up your work after adjusting to the size you want it to be. And remember to adjust your image to the maximun quality to have good pictures. If you save it under 10, your pictures will come out looking pixelated. Ew.


AND THAT'S ABOUT IT! THIS IS HOW I USUALLY EDIT MY PICTURES :)


The final product after adding the watermark :D So how, did you learn anything you dint know? I hope you did! Enjoy playing with Adobe Photoshop.


Note: This might not be the most accurate way, or the right way, or the simplest way but it is how I make things work :)

Labels:


Wednesday, May 9, 2007

Dont Worry, Be Ugly

Do you know that you have no more excuses to give whenever whoever wants to take your pictures? You cannot tell them that you're ugly, you're not photogenic, you've a big pimple on your nose, you've got big eye bags, you've got unwanted moles and that you have yellowish teeth.


CANNOT! CANNOT!


This is because there is such programme called the Adobe Photoshop. Do you know that Photoshop can do wonders ad magics on your pictures? Do not tell me you know now. And do not say that you dont know how to use it. Even a simple "Spot Healing Brush Tool" can help you remove your pimples away by clicks away. Hahaha.

Dont just stuck in the "Hue & Saturation" and "Brightness & Contrast" tool in it. You can do so much more in it. Its okay if you do not attend photoshop classes, you can always learn by yourselve by trial and errors tactic. You'll feel damn good and satisfying and I-dont-know-what-else after you'e seen good works done by yourselves. Even if you still can learn it by yourselves, you can always refer to tutorials available online. They are free (click here!)

And its good enough when you can master the basics of Photoshop. Hehehe. No more excuses!! NO MORE!!! And you see.......


I can erase wrinkles on my neck, erase the ugly strap, erase the ugly background, erase my mole, make my eyes balance (okay, someone helped me with this), and adjust the colour nicer leh! Hahaha.

That's why I'm so in love and so obsessed in my Adobe Photoshop version CS2. :) This proved even a full-flawed human or picture can be flawless! And now I want the brand new Photoshop CS3 leh! It has even more cool features that I've not came across. :(


Okay,now this entry remind me of my Computer Graphics' exam tomorrow. Haha. And I'll be tested on Adobe Illustrator. So, I shall close my Photoshop now and practice on the Illustrator! Cioas.

Labels: ,